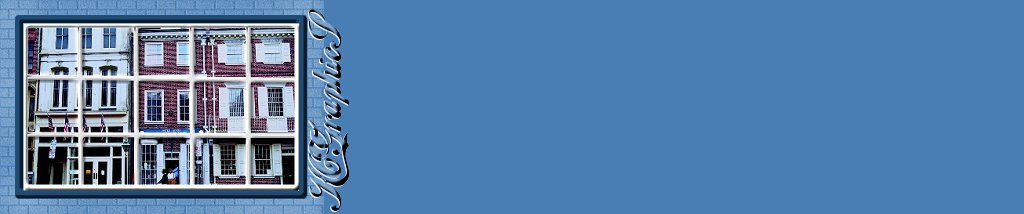
Square Windows Tutorial
by: Kathie Cureington
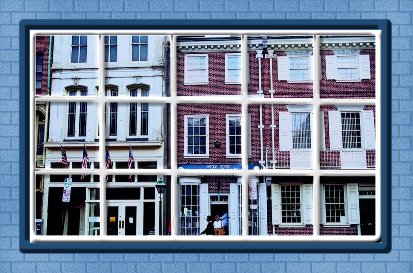
This is another window I have
said
I'd write a tutorial for..
You will
make this as if you are looking
out
a window. Any graphic that
you'd see
outside a window would be
great!!
I choose this one because I
liked the
way the building had
the same
square panes we are making
here.
If you were looking at a lake
or
forest scene you might want
to make wood looking windows.
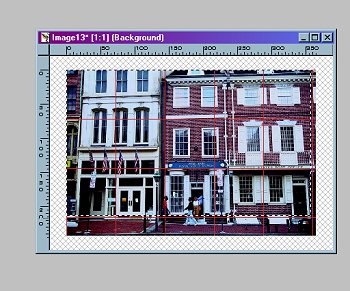
Open your graphic in PSP
The first thing I do is
go to file/save as
and give this a name
That way if after alot of
hard work your
computer freezes up you
won't lose your work.
Remember to click the File/save
button
after each step.
Have your grid turned on.
I have my grid set in
File/preferences/rulers and
units
to 72 x72
with my lines in red.
I used my rectangle selection
tool to
crop so I only had full
squares
on my window.
After selecting the area,
I went to
Images/ crop to selection
Choose your single line tool
White in your top color box
single line
Stroked Width 6 Antialias checked
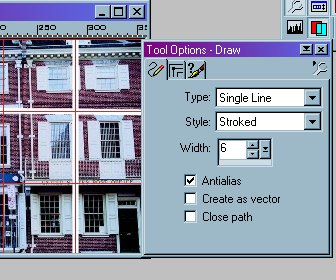
Start drawing lines over
each if the grid lines.
Center the grid mark in your
line.
Do the vertical and horizontal
lines.
When you start at one side
and draw your mouse along
you will see
a transparent line with your
grid
showing in the middle of it.
When you get to the end and
let up on the mouse
you will have your white line.
If it doesn't look straight
with the grid
go to edit/ undo and re draw
it.
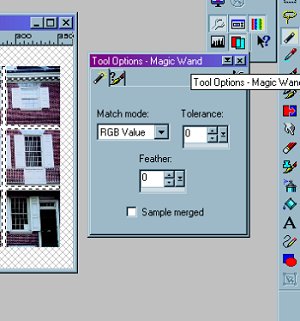
Choose your selection tool
(magic wand) and
Click in the white. All of
the lines will be selected.
(with marching ants)
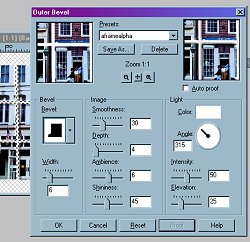
Go to Image/ Effect/ Outer
Bevel
Set your Bevel to these numbers.
Width 6
Smoothness 30
Depth 4
Ambience 6
Shiness 45
Intensity 50
Elevation 25
You can give these settings
a name
such as windowpanes
by clicking the save as box
on the top
so you will have it to use
again.
I used the same bevel setting
in both window tutorials.

Have white in your top color
box
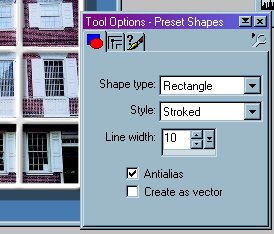
To add the outerpane choose
your shapes tool
Rectangle/ Stroked/ Width
8 /Antialias checked
Select the with your magic
wand, using the same
outer bevel as the inside
lines

Add a border. Images/ Add border.
Be sure the color you choose
is in the bottem color box.
This will be your inside wall--remember
you are
inside--looking out.
This will be the window frame.
Choose a color darker
than your border.
Choose the shape tool/Rectangle/
Stroked/Width 10/ antialias
Select the dark line you just
added.
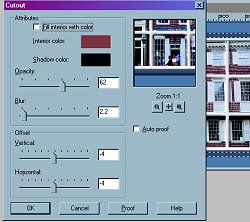
Got to Image/Effects /cutout
Add the settings
Opacity62
Blur 2.2
Vertical and horizontal -4
(minus 4)
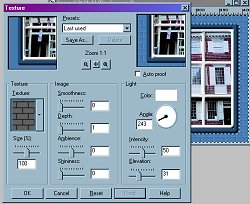
I decided to make my wall brick.
(You could come up with really
neat ideas here
using wood, wallpaper, textures..Have
fun....)
I selected the border
went to Images/Effects/texture/medium
bricks
Click OK
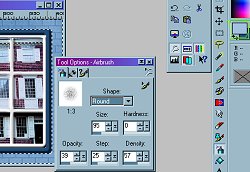
Using a lighter shade of your
border color and
having it tin your top color
box
Choose Air Brush tool
Size 95
Hardness 0
Opacity 39 Step 25
Denisity57
Go to the Tab on the tool options
between the
spray can and the brush and
set your paper
options at Medium brick
After you use this tool ,you
might want
to go back and set it to none
on paper--
sometimes I forget and wonder
why my
colors won't work right next
time--Yup...I forgot
and left the paper on a texture!!
With the border selected spray
your lighter color--
you will see the bricks pop
out as you spray.. Add as
much lighter color as you think looks good.
You are ready to resize and
use your new window
I added a blue border and
added my name
between the solid color and
blue brick. There
are may ways to use this on
your back ground.
I hope you enjoyed this tutorial
and
I also hope you have fun designing
your
own windows!!!
Be sure to go to File/ Save
as/ and save your work.