This tutorial will help you get started using both the Raster and
Vector layers in PSP6
Open PAINT SHOP PRO 6
1.File\Open ..
Open your graphic in PSP6 ..
Go to View\Tool Bars\check everything
except Histogram. Click "OK"..
Resize image to
W.25
(your height will change in accordance to that width)Choose a color from your graphic to use for
your border, with the eye dropper tool.
Be sure it is in the bottom color box.
Choose Image/Border/Symmetrical/20 in each box.
Select your border with the selection tool.
Use these settings.
Match mode -RGB
Tolerance 0
Feather 0
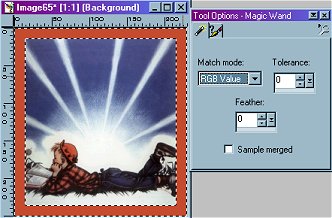
Keep the border selected( marching ants)
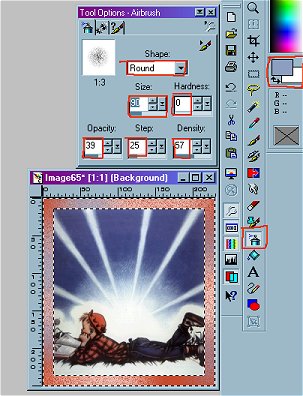
Left click
on 2 other lighter colors
from your graphic
with the eye dropper color tool.
We will use these to air brush with.
Use small burst with your mouse
lightly over different areas
of your frame. Because your border is selected the
paint will only be in the border.
Use the the darker color first,
then highlight with the lighter color.
If you get more color than you want go to
Edit/ Undo Airbrush and try again.
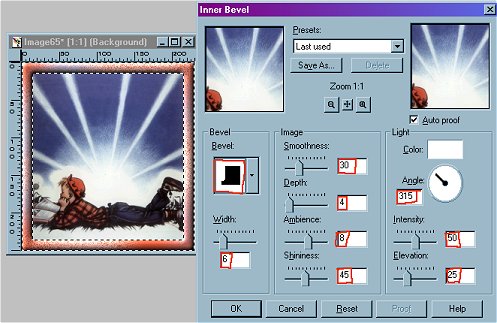
When the colors look like you want them to
We will go to Image/Effects/Inner Bevel
and use these settings.
You can save this setting
Using Save As and give it a name-( "my frame" for example)
Selections/Select none
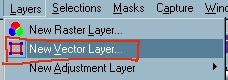
Now we will change to use the Vector.
Layer/New Vector layer
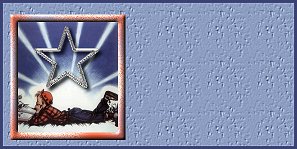
Choose a shape from the Shapes tool
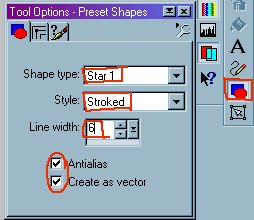
Star 1
Stoked(that means a line instead of solid)
line width 6Have white in your top color box
Put your cursor on your graphic
in the area you want your shape to be,
and holding down your mouse
start slowly pulling toward the bottom.
You will see your star shape forming.
It does not have to line up perfectly
because you can move it, and resize it.
You might want to try a couple of practice
shapes if you have never done this before.
You can pull the points around at the corners,
by the little square boxes.. Move the
entire star in any direction. Work with it to
get it to be on your graphic just where you
want it. When it looks right to you go to,
Select/select none.

Now in order to use a filter on here
we need to convert it back to a Raster layer.
If you don't all your Image options will be grayed out
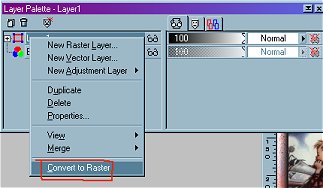
Right click on your layer 1 in your layers drop down box
On the bottom you will see
Convert to Raster. Click that box.With your selection tool click on the white star.
You will have the marching ants going around
it. Go to Images/plug ins/Flaming Pear/Blade ProUse the Blade pro
With the star still selected preset
Mah_Whitediamonds
(You can find it on Mahogany's page along
with lots of great presets.)Optionally--if you do not have Blade Pro
after you select your star go Image/Effects
Inner Bevel and use
the same settings you used on your frame.I recommend Blade Pro highly.
If you don't have it you might want to
click here to get a trial version.
www.flamingpear.comWith the star still selected
go to Image/Effects/drop shadow
Opacity 86
Blur 9.8
Vertical and Horizontal 6
Color Black
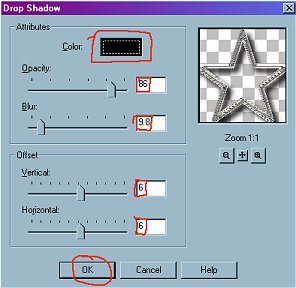
Selection/select none.
Make a new image 1024 x 300
Back ground white.
Flood fill with a color from your graphic.
To add texture go to
Image/effect/texture
I used # 54 on here
from the drop down texture box on the left.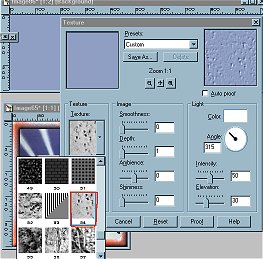
You might find another one you like better
to go with your graphic.Click on your graphic with the star
Edit /Copy
Click on your new back ground
Edit/Paste as new layer.Layers /Merge All
File/Save As:
I hope you enjoyed this tutorial and will try it
using different graphics, shapes and textures.